


Installation guide
1. Download installation package
Go to http://www.vrcworld.com/downloads.aspx. You can choose one of the main download locations listed on top of page (usually 2 download locations are available). If this fails, there are alternative links on bottom of page which point to our main server, but using these links can lead to slower download speed.
The setup file contains only core files needed for the installation, other files will be downloaded automatically by the game updater when you first start the game.
2. Run the setup
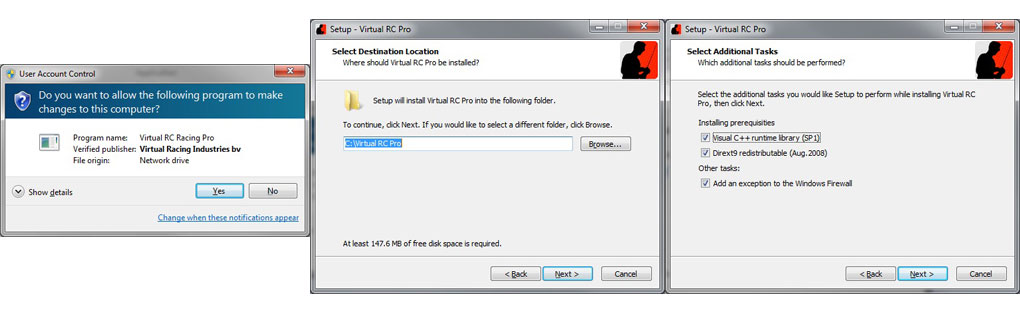
Complete the entire setup procedure. The default location where the game is installed is 'C:\Virtual RC Pro'.
But you can choose another location, like on another disk or so.
If you are sure that DirectX 9 is already installed on your computer or if you’ve already installed VRC Pro before,
then you can uncheck the DirectX installation.
Please note, the DirectX 9 is not preinstalled with your Windows operating system (on Windows 7 only DirectX 10 is installed).
After you’ve successfully installed the VRC Pro software, a shortcut is placed on your desktop.
3. Run the Virtual RC Pro
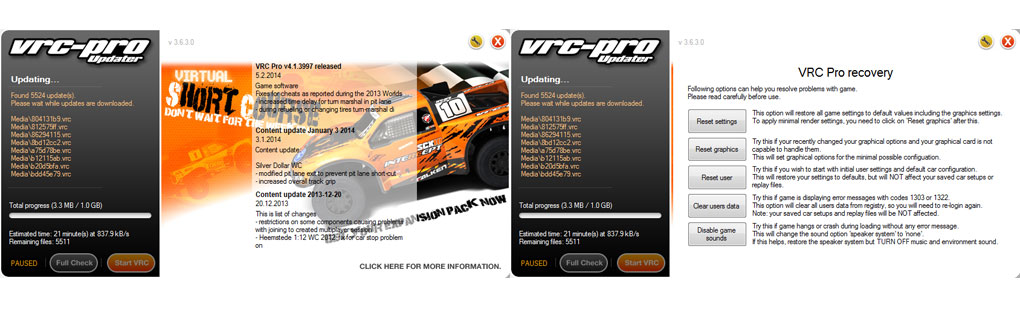
Click on the game icon. This will start the updater, which initially downloads the rest of game files (about 1 GB in total). If the updater fails during downloading process, first run it again. The download will continue.
Tip: You can pause the downloading by double-click on the progress bar. To resume, simple double-click it again.
The updater also provides useful functionality for troubleshooting in case there is a problem with the game. You can click on the 'options' icon (next to the close button) to open the 'VRC Pro recovery' dialog.
Possible problems & solutions:
- the updater fails to connect to internet: please ensure it is not blocked by your firewall or antivirus software
- updater is reported as a security risk by Avira antivirus: this is 'false positive' report. We use this component to protect the executable from tampering, so far we do not have alternative to avoid this.
- if the updater finishes with error, you can check the 'updater.log' file for problem description. Do not forget to include it if you will report problems through the web support section: http://www.vrcworld.com/support/submit.aspx
4. Start the game
When the update process finished successfully, you can start the game by clicking on 'Start VRC' button in updater.
5. Read the game user manual
The game user manual contains usefull information about the software itself, game features, connecting your USB adaptor, shortcuts used in the game and much more.
Common problems / tips
You do not need to 'reinstall' the game once installed.
The game does not require to be 'installed', you can also transfer it from another computer by just copying the game folder.
To put the game to the 'initial state' use the recovery screen in game updater and click on 'Reset settings' and 'Clear users data' buttons.
If for some reason you decide to reinstall it, then please backup the 'Media', 'Components' and 'Tracks' folders to avoid downloading the 1GB of data via the updater again.
Transfer game to another computer.
The recommended way to do this is:
1. download and install the VRC Pro setup, but do not run the updater yet (or stop it)
2. copy all files from your old computer to the new computer:
- whole game folder from "C:\VirtualRC Pro" (or where it was installed)
- your saved setups, replays, ... from your documents folder (c:\Users\YOUR_NAME\Documents\Virtual RC Pro\)
3. now run the updater and the game
"Can not connect to VRC server" message
Usually this occurs when your firewal or antivirus is blocking the game executable from accessing the internet.
Please check your security configuration and allow 'vrcpro.exe' and 'game.exe' files to connect to internet.
For other reasons please check following knowledge base articles:
- (1026) Client Cookies Setting Problem
- (1500) Can't connect to service, check your internet connection
"d3dx9-39.dll is missing" message
This means you didn't install the DirectX 9. Please run the installer again and choose to install this component.
Support
If you will still encounter a problem during set-up or update process,
please create support ticket and attach the screenshot or anything which can helps us to identify your problem.
